
Topic 1: Step by Step Installing Android Development Toolkit
Topic 2: Step by Step Writing My First Android Application
Topic 3: Android Application Architecture
Topic 4: Automating Android Browser Testing Using Android WebDriver
Step by Step: Installing the Android Development Toolkit for Windows and Eclipse
Pre-requisites:
- Eclipse should be installed you machine (Helios 3.6 or greater)
- Android SDK should be installed on your machine(not mandatory but recommended)
If you have Android SDK and Eclipse already installed on your machine then you can start with the steps below:
- Open the eclipse IDE
- Click on the Help menu to open the menu
- In the Help menu click on Install New Software

- Click on the Add button to open the Add Site dialog box
- Enter the name as “ADT Plugin”
- Enter the location: https://dl-ssl.google.com/android/eclipse/
- Click “Ok” button to fetch the necessary bits to the Available Software installation section
- Upon successful completion of previous step you will see the Developers Tools check box
- Select the Developer Tools check box and Click the Next button
- The success in previous step will require 'org.eclipse.ui 3.6.2' else an error will be displayed. Make sure to have ‘eclipse 3.6 (Helios)’ or greater on your machine else the following error is returned: “Cannot complete the install because one or more required items could not be found. Software being installed: Android Development Tools 16.0.1.v201112150204-238534 (com.android.ide.eclipse.adt.feature.group 16.0.1.v201112150204-238534) Missing requirement: Android Development Tools 16.0.1.v201112150204-238534 (com.android.ide.eclipse.adt.feature.group 16.0.1.v201112150204-238534) requires 'org.eclipse.ui 3.6.2' but it could not be found”
- Click Next on the screen displayed upon successful completion of previous step a list of tools to be downloaded

- Accept the license agreement then click Finish

Note: If the following error message is displayed:
“An error occurred while collecting items to be installed session context was:(profile=SDKProfile, phase=org.eclipse.equinox.internal.p2.engine.phases.Collect, operand=, action=). HTTP Server 'Bad Gateway’: https://dl-ssl.google.com/android/eclipse/plugins/overlay.com.android.ide.eclipse.adt.overlay_16.0.1.v201112150204-238534.jar HttpClient connection error response code 502.”
Try one of these to resolve:
Try to repeat the installation steps (This worked for me)
If the error persists upon restart you can try eclipse Enterprise Edition to solve the issue. (Worked for many others)- Upon successful completion restart eclipse
- When eclipse restarts you should see the 'Welcome to Android Development' dialog box

- Select the 'Use existing SDKs' as by this time you have Android SDK already installed on your machine and click Finish button
- If the above dialog does not appear on restart you can point eclipse to the Android SDK using the following steps:
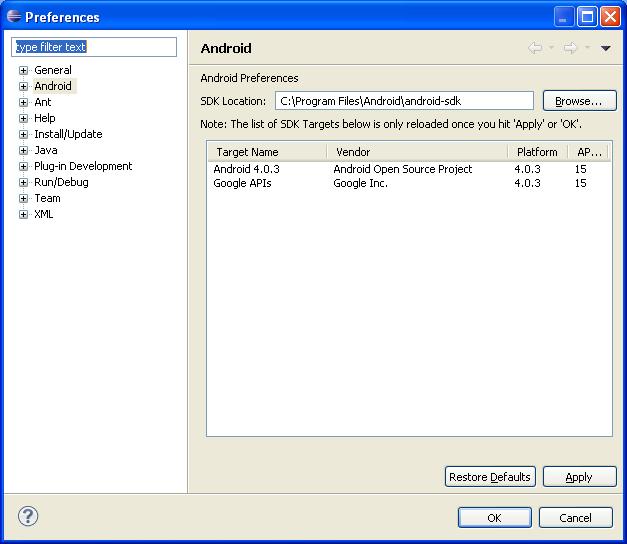
a. In the Windows menu click on Preferences to open the Preferences dialogb. Select the Android option in the left panelc. Click on the Browse button and point to the Android SDK directoryd. Click Apply and Ok button to complete the configuration
This completes the installation and configuration of the eclipse ADT plugin and we are all set to write our first Android application.
Pre-requisites:
- Eclipse should be installed you machine (Helios 3.6 or greater)
- Android SDK should be installed on your machine
- ADT plugin should be installed (Step by Step: Installing the Android Development Toolkit for Windows and Eclipse)
If the above three requirements have been fulfilled then you are all set to write your first application. Just follow the steps mentioned below:
- Open eclipse
- Click File --> New --> Project to open the New Project dialog

- Select Android Project and then Click the Next button
- Enter the project name as MyFirstAndroApp set the project location and then Click Next button

- Select the API (Android 4.0.3) and Click the Next button

- Name the application as MyFirstAndroApp, put the package name com.test.andro.base (you can choose your favorite names and alter the code snippet provided below)
- Create Activity named ‘MyFirstAndroAppActivity’, Minimum SDK, and Click Next button

- The application folder structure should be displayed as above and the following code snippet is generated:

- Modify the code to display a simple text message:

Import the TextView class (android.widget.TextView)
Create a new TextView object ‘tv’
Set the text to be displayed
Pass the ‘tv’ to the setContentView() method
Set the text to be displayed
Pass the ‘tv’ to the setContentView() method
- Save the above changes

- Run the application Run As --> Android Application the logs will read as follows:
[2012-01-31 16:07:04 - MyFirstAndroApp] Android Launch!
[2012-01-31 16:07:04 - MyFirstAndroApp] adb is running normally.
[2012-01-31 16:07:04 - MyFirstAndroApp] Performing com.test.andro.base.MyFirstAndroAppActivity activity launch
[2012-01-31 16:07:04 - MyFirstAndroApp] Automatic Target Mode: launching new emulator with compatible AVD 'DefaultAndroidEmu'
[2012-01-31 16:07:04 - MyFirstAndroApp] Launching a new emulator with Virtual Device 'DefaultAndroidEmu'
[2012-01-31 16:07:30 - Emulator] emulator: WARNING: Unable to create sensors port: Unknown error
[2012-01-31 16:07:30 - MyFirstAndroApp] New emulator found: emulator-5554
[2012-01-31 16:07:30 - MyFirstAndroApp] Waiting for HOME ('android.process.acore') to be launched...
[2012-01-31 16:08:30 - MyFirstAndroApp] HOME is up on device 'emulator-5554'
[2012-01-31 16:08:30 - MyFirstAndroApp] Uploading MyFirstAndroApp.apk onto device 'emulator-5554'
[2012-01-31 16:08:30 - MyFirstAndroApp] Installing MyFirstAndroApp.apk...
[2012-01-31 16:09:08 - MyFirstAndroApp] Success!
[2012-01-31 16:09:08 - MyFirstAndroApp] Starting activity com.test.andro.base.MyFirstAndroAppActivity on device emulator-5554
[2012-01-31 16:09:09 - MyFirstAndroApp] ActivityManager: Starting: Intent { act=android.intent.action.MAIN cat=[android.intent.category.LAUNCHER] cmp=com.test.andro.base/.MyFirstAndroAppActivity }

- The virtual device is loaded and the application is pushed to the Android Virtual Device. The output screen looks like this:

This is one of the knowledgeable post.i like this post.This kind of information will help you to increase your website visibility.Android app developers
ReplyDeletethanks!
DeleteHi Satyam,
ReplyDeleteNice post.I am a tester but manual.I dont know anything about Android app development.
what is this could you give me the introduction about this please
I have tried to summarize the architecture in one of the posts:
ReplyDeletehttp://satyamsing.blogspot.in/2012/02/android-application-architecture.html
If you need more details you can refer to android documentation from:
http://developer.android.com/guide/components/fundamentals.html
yurtdışı kargo
ReplyDeleteresimli magnet
instagram takipçi satın al
yurtdışı kargo
sms onay
dijital kartvizit
dijital kartvizit
https://nobetci-eczane.org/
LN5QTP
Angila yurtdışı kargo
ReplyDeleteAndora yurtdışı kargo
Arnavutluk yurtdışı kargo
Arjantin yurtdışı kargo
Antigua ve Barbuda yurtdışı kargo
Xİ4